RECENT ARTICLES
- CEBRA: An optimised and standardised sampling protocol for BioBlitz
- Stop it people, the plural of anecdote IS data!
- That's no pollinator, that's a flower visitor
- Add a scale to your macro photos
- What to photograph when counting the wild
- Imagine counting the wild on EVERY street in a city!
- My wild counting workflow
- A butterfly flew through
- Why iNaturalist observations without photos can be research grade
- Why you shouldn’t use a spreadsheet for data entry
- All articles ...
Add a scale to your macro photos
How to use the Watermark module in Darktable to add a scale to macro photos
written Jul 26, 2021 • by jonsullivan • Category: Wild Counting

A photo of a species is useful for science if it can be used like a well-labelled museum specimen. We know exactly when and where a museum specimen was found, and we can take a closer look at it and make measurements. The “when” is easy with a photo, as modern cameras and smartphones embed the date and time in photos. I’ve written before about geotagging photos with their exact location, which is especially important when a camera doesn’t have its own inbuilt GPS. Making measurements is often the thing that is lost from a photo, because it’s not clear exactly how big the thing is that was photographed.
So, how would someone know how big that thing was in your photo? The size of some part of the organism can help to clinch its identification. It can also indicate the likely health, condition, and age of the organism. With many observations, you could figure out how the size changes through the seasons or from place to place. If it’s a real specimen, you can make measurements. How do you do that with a photo?
The simple solution is to add a scale to your photos. In many cases, that’s as simple as putting a ruler, or a coin, or some other item of known size, into your photo. For branches and flowers and fruit, I often just use my hand. I have photos of my hand with a ruler in case I ever need a more accurate calibration. All this is a lot harder if the things you’re photographing are very small, especially if they might fly away at any moment.
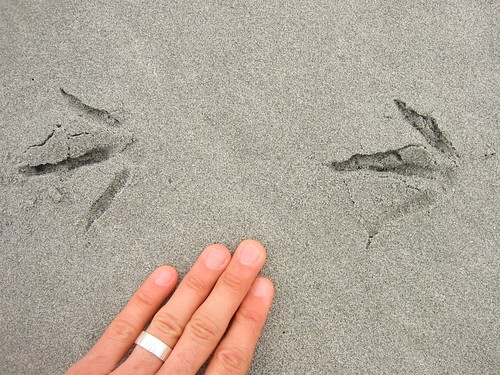


When I’m photographing insects with my macro lens, I’ve instead got into the habit of always using the lens focused as close as it can go, at least for one of the photos I take of an insect. That way, I can figure out later exactly the size of the things in focus in these photos. That’s because I also have a reference photo of a ruler taken with that lens focused as close as it can go.
What I hadn’t done, until today, is figure out how to use this information to add a scale to my macro photos. Until now I’ve been sharing photos on iNaturalist without a scale so others wouldn’t be able to figure out the exact size of what I’ve photographed. It turns out that adding a scale is not difficult.
I tag and process my photos using Darktable, a free, open-source computer app available for Linux, Mac, and Windows. It’s a capable although complicated app, that let’s you do a great deal with photos. One of those things is adding watermarks. Those are typically used for professional photographers to add their name and logo to their photos. It didn’t take me long at all to use Darktable’s Watermark module to whip up a scale.
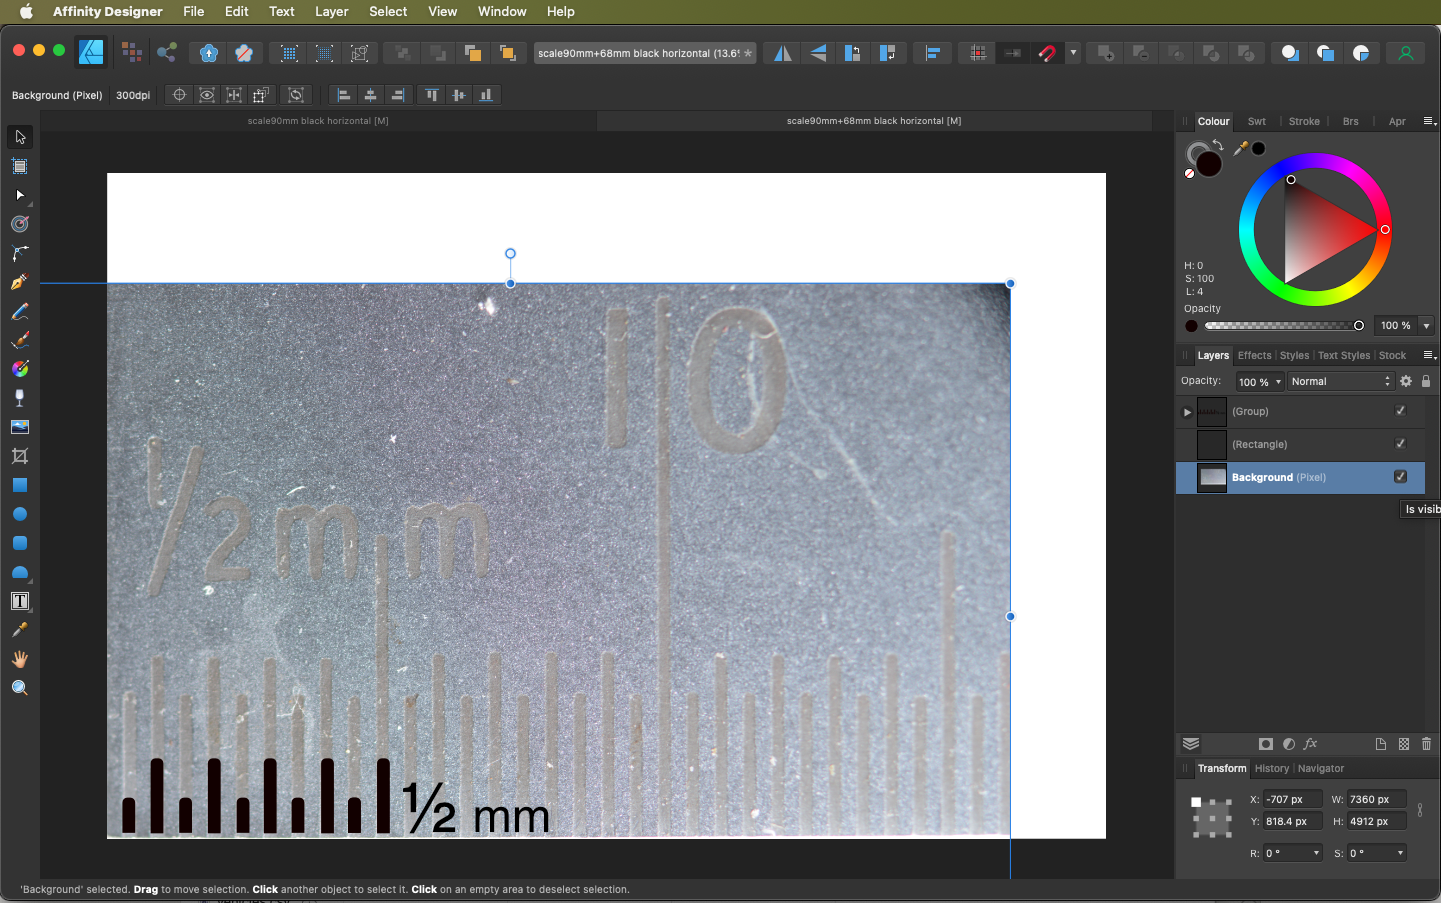
To add a new watermark to Darktable, you first need to make an SVG image file in a vector art app. Vector art is made up of lines and shapes, not pixels, and so remains sharp at any size. The free open-source Inkscape is a good vector art app and would do the job nicely. I have Affinity Designer on my Mac so I used that instead.
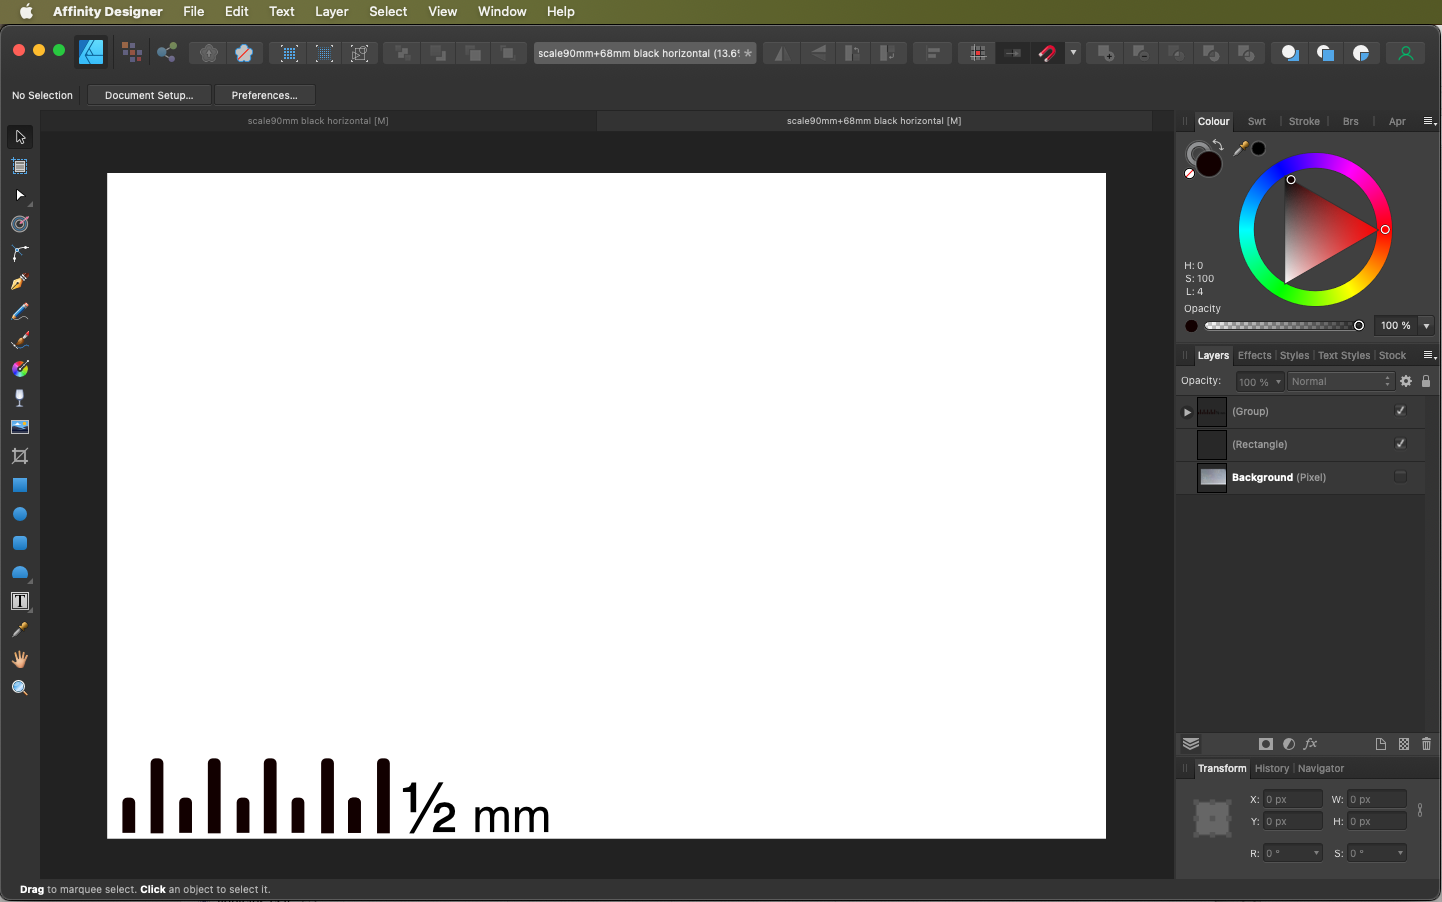
To make sure that the scale sizing was exact, I made the dimensions of my vector file the same as a full size photo from my camera. I then (temporarily) added on my photo of a ruler, taken with the same camera, lens, and focus setting. I carefully drew clean new lines over a corner of the ruler, to make a sharp, non-pixelated scale. I put text saying what the scale increments were (in my case 0.5 mm), and I then deleted the ruler photo. Bingo! [Update: Since Darktable 4.0, I also have had to add a layer with a transparent rectangle the exact dimensions of the photo. That ensures that the scale is positioned at exactly the right scale over the photo.] I then save my file in SVG vector format.
With Darktable quit, I put that SVG file into the right Darktable folder, and then I open Darktable. Where the right Darktable folder is will depend on whether you’re on Linux, Mac, or Windows. On a Mac, darktable’s library and settings are in the hidden .config folder in my home folder. To find it, you need to unhide the hidden folders in the Finder using shift-command-. or use the Go menu to do Go/Go to Folder... and type “.config”. Inside the darktable folder in .config, there will be a folder called watermarks (if there’s not, make it). All the SVG watermark files go in this folder. Linux and Windows will be the same, but you’ll first need to figure out where the darktable folder is on your computer.
The first scale I made was in black (as shown above) and so only worked well on pale photos. To give me some more options, I made a second version with a white scale for use on darker photos. Those were both designed for horizontal (landscape) photos. I then made black and white versions for vertical (portrait) photos. As a victory lap, I then made other sets of scales for my macro lens with different combinations of my extension tubes attached (which focus in much closer).
Once you’ve made the scale watermarks, and added then to the watermarks folder in Darktable, then adding a scale to macro photo is easy. Just select the photo and go to the watermarks module and then select your appropriate scale from the drop-down list in the module’s marker menu.
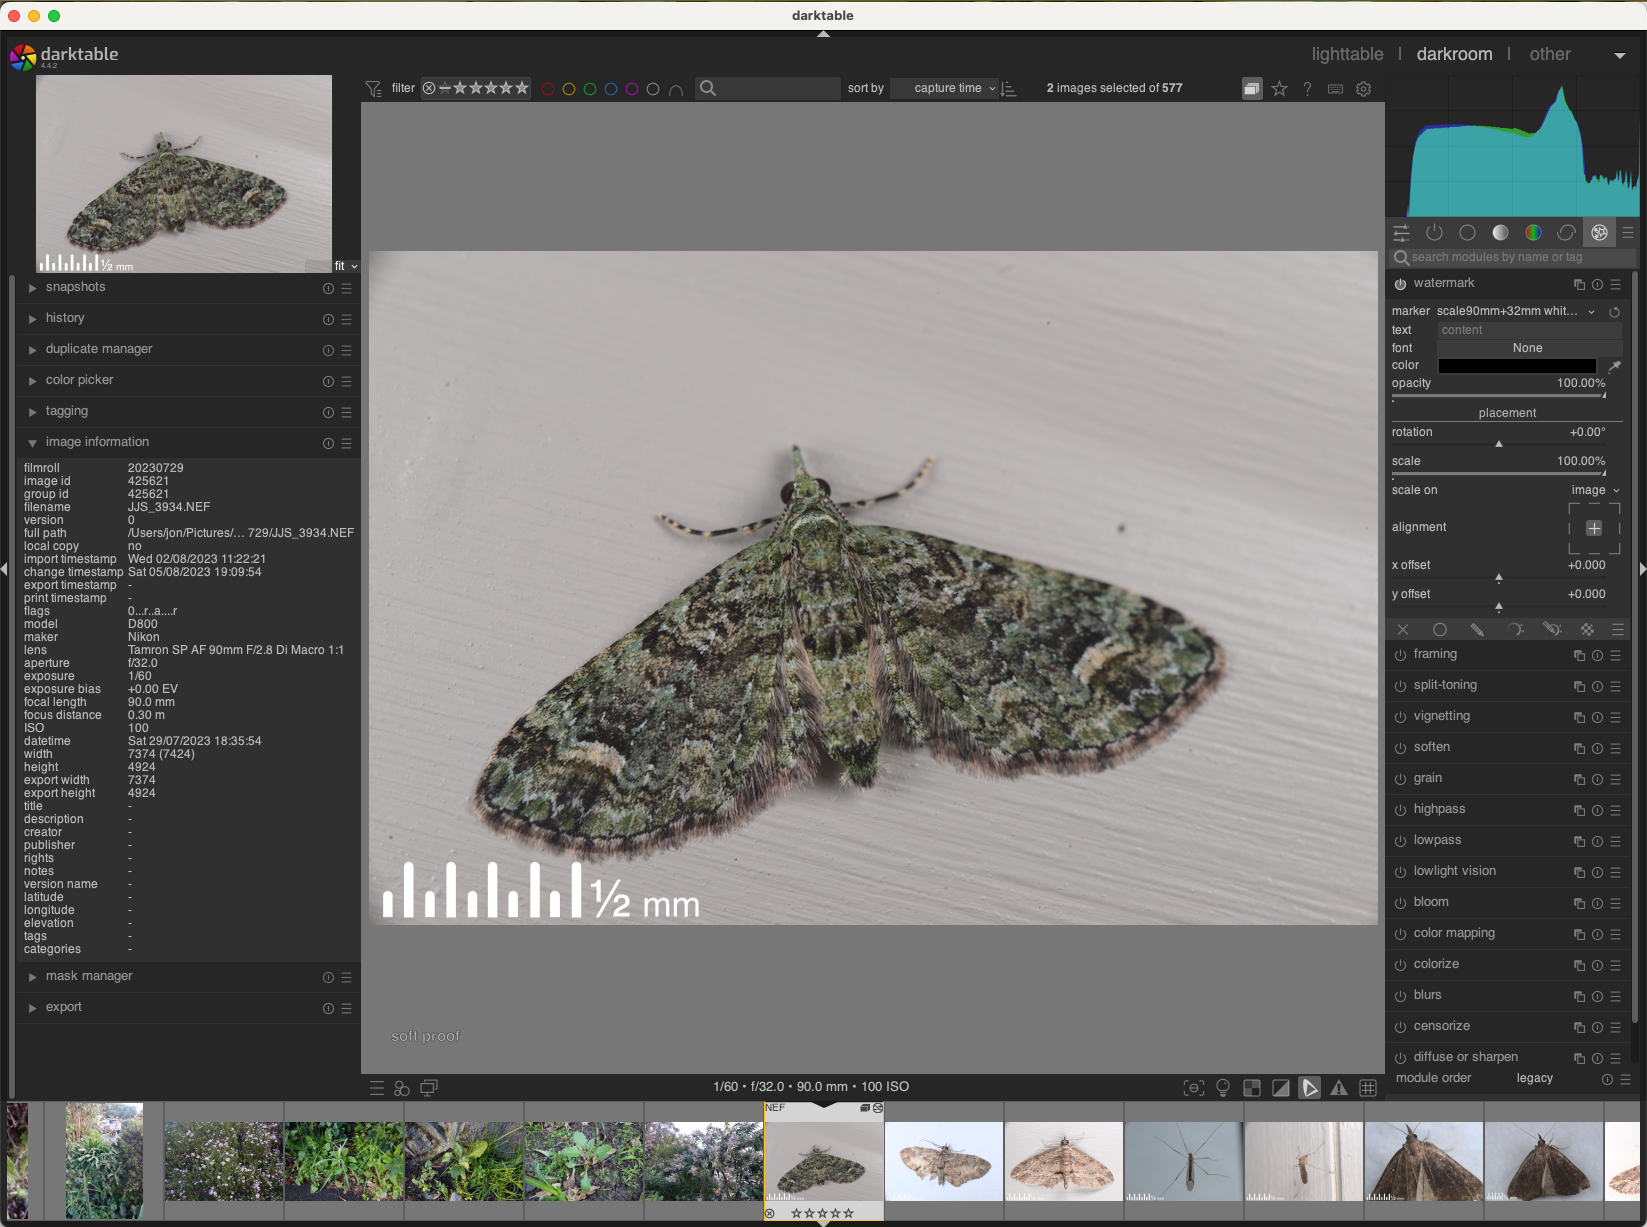
The only thing to note is that watermarks in Darktable does not change size if you crop (zoom) the photo. That means that the scale will be the correct size only for photos with the original dimensions. If I want to crop a photo, I do that on a duplicate of the image without the scale, and share both images online to iNaturalist.
Of course, one scale won’t work on photos taken at a different resolutions, such as with a different camera. I therefore label my scale watermarks with the camera and lens combinations they belong with. Care needs to be taken to add the right scale watermark to the right photo.
It all works well. Now I can quickly add a scale to my macro photos. I can just as quickly add scales to a whole batch of macro photos that I select at once. I can then and share them on iNaturalist with the all-important size included. Ta dah!