RECENT ARTICLES
- CEBRA: An optimised and standardised sampling protocol for BioBlitz
- Stop it people, the plural of anecdote IS data!
- That's no pollinator, that's a flower visitor
- Add a scale to your macro photos
- What to photograph when counting the wild
- Imagine counting the wild on EVERY street in a city!
- My wild counting workflow
- A butterfly flew through
- Why iNaturalist observations without photos can be research grade
- Why you shouldn’t use a spreadsheet for data entry
- All articles ...
A workflow for bulk adding annotated photos of wild species to iNaturalist
Using the iNaturalist website with the darktable photo app to bulk annotate and upload photos.
written Jun 7, 2018 • by Jon Sullivan • Category: Wild Counting

Do you use iNaturalist? You should. iNaturalist is a great way to share and discuss observations of species, get species identified, and help others identify species. It’s a big, friendly global social network for nature enthusiasts, naturalists, wild counters, and everyone else.
If you’re interested in the identity of some wild thing that you find, head on over to iNaturalist.org, or its local chapter in your corner of the world. For example, iNaturalist.NZ is the New Zealand community inside the global iNaturalist Network. (Disclosure: I’m a site admin for iNaturalist NZ.)

There are many ways to share observations on iNaturalist. Observations can be text only (“I saw this!”) or have associated photo(s) and/or audio recordings.
If you’re a smart phone user and a casual nature watcher, the free iNaturalist app is for you. Use the iNat app to take a photo, upload it, and that’s it. The app even uses iNaturalist’s machine learning engine, Computer Vision, to guess what species you’ve photographed, before real naturalists look at it. It’s often remarkably accurate, thanks to it being based on the huge effort that experts have invested in identifying photos uploaded to iNaturalist.
Use the iNat app to take a photo, upload it, and that’s it.
A workflow for power users
If you’re more of a “power user” (like me), then the iNaturalist website will be your home. You can find me on iNaturalist NZ at @jon_sullivan. For website users, iNaturalist has several great options for bulk uploading and bulk editing observations. Here I describe my personal workflow for bulk adding photos.
My general approach to sharing things on the internet is local+cloud. In other words, I’m happiest when I have a local copy of my precious things as well as a shared version online (yes, I said “my precious”—perhaps I should be worried). I like to annotate, identify, and tag up my observations on my computer before uploading them to iNaturalist, rather than enter those details via the iNaturalist website. My way is also the fastest.
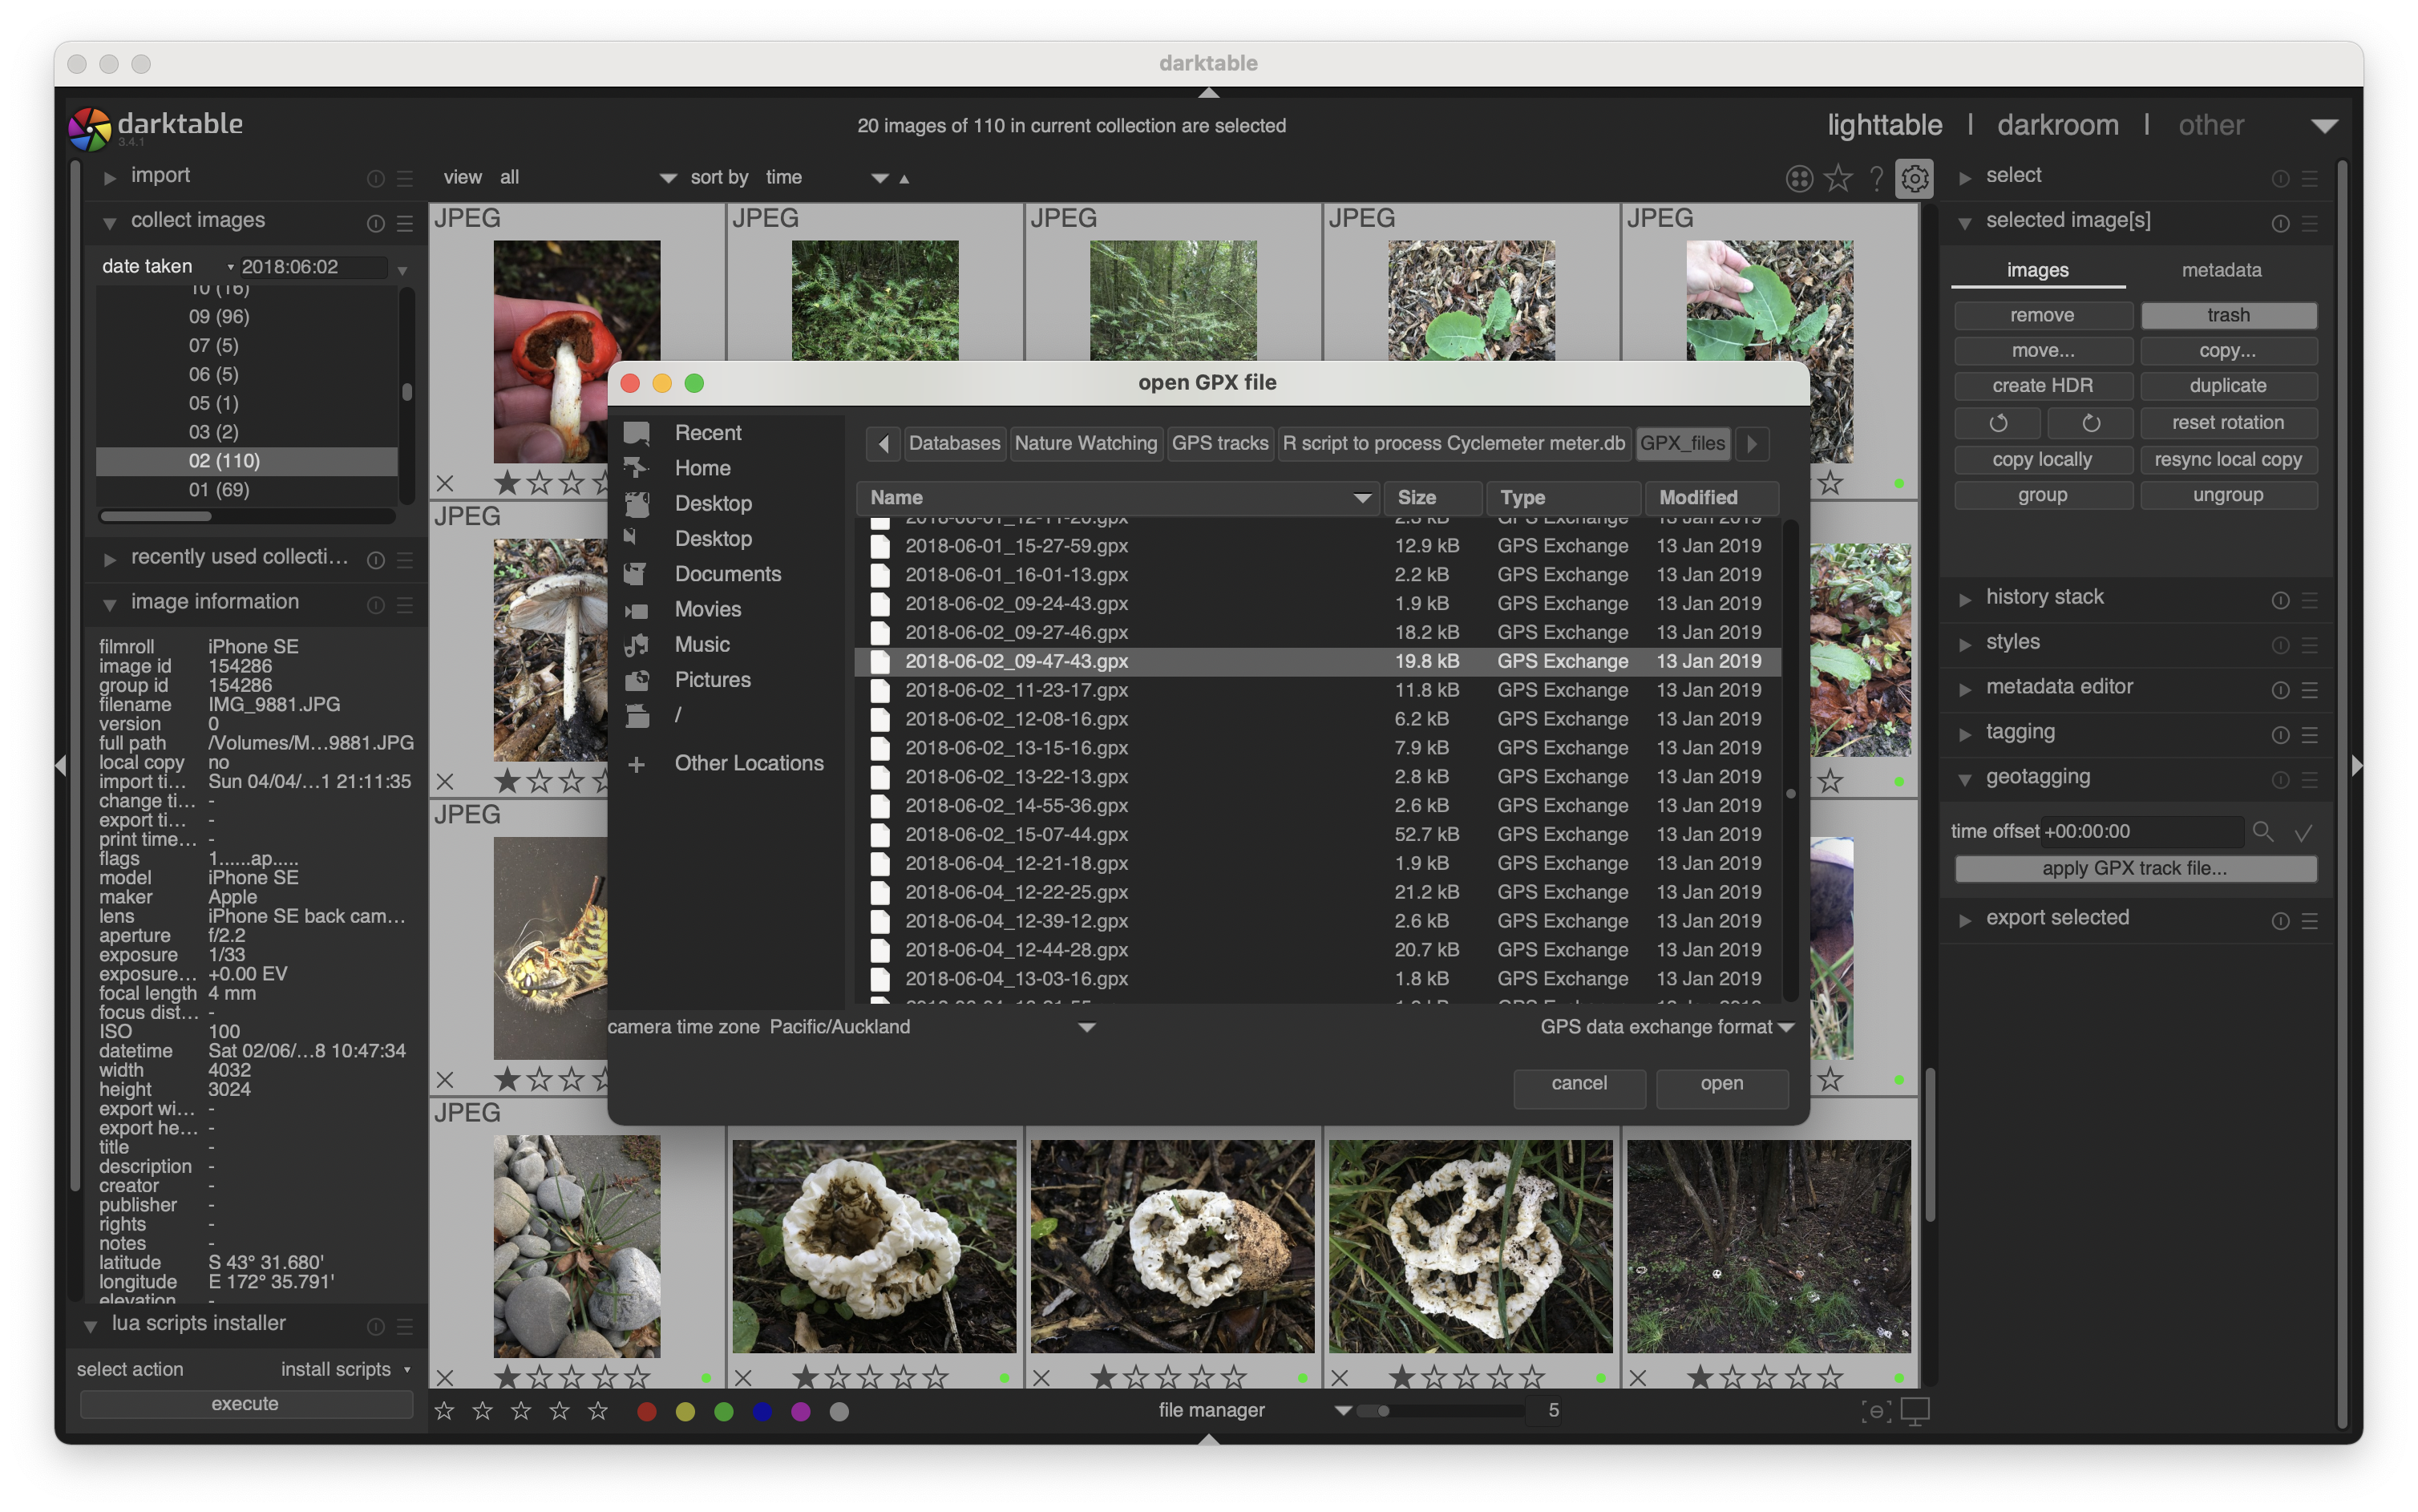
I do most of the heavy lifting in darktable. Darktable is a free, open-source photo management and RAW photo processing app, available for computers running Linux, Mac, and recently Windows. One of the great things about darktable is that it doesn’t make any changes to my original photos. It instead stores all the modifications in an industry standard XML text file next to each photo file. Every crop, rotation, colour adjustment, location correction, and tag are stored in the XML. All can be undone.
I open darktable, drag all my photos from a trip onto it, wait a moment for darktable to make all the XML “sidecar” files for each photo, and then off I go.
Geotag photos
My DSLR camera doesn’t have an inbuilt GPS so I geotag it’s photos in darktable, using my GPS tracks from the same trip. These tracks are GPX files that I export from the Cyclemeter app on my iPhone (or downloaded from my GPS unit if I’m carrying it). This is as simple as selecting the GPX file with darktable and specifying the time zone. Darktable then automatically adds the right coordinates onto every photo with a matching date and time.
I don’t necessarily need to do this for my iPhone photos as the iPhone automatically geotags them at the time they’re taken. However, if I’m geotagging a day’s photos, I’ll include my iPhone photos as well. That’s because very occasionally my iPhone will get very confused (for example, when I take a quick photo just after turning it on) and the coordinates on a photo will be noticeably out, at worst by hundreds of metres. When I’m tracking with a modern GPS unit, geotagging my iPhone photos gives me more accurate locations.
Once I’ve geotagged a batch of photos, I then add a darktable tag to them that lets me know the source of their location information. Currently I use the following tags for this.
GeoTagged|Geotagged with Garmin GPSMAP64
GeoTagged|Geotagged with iPhone SE-Cyclemeter app
GeoTagged|Geotagged automatically by iPhone SE
GeoTagged|Geotagged manually in Darktable
The last two options are for photos that I haven’t batch geotagged with a GPX file. Instead, I’ve either trusted the coordinates provided by my iPhone’s camera, or I’ve manually located photos on the darktable map. I use those options when I didn’t have a GPX file for the time when I took the photos.
Species tagging photos
When all my photos from a trip are geotagged, I then move through them adding tags and (if needed) captions. At minimum, I tag them all with a species name (or higher taxon if I don’t know the species) and a place name. In darktable I can easily select a group of photos at once and apply one tag to them all (e.g., the place name).
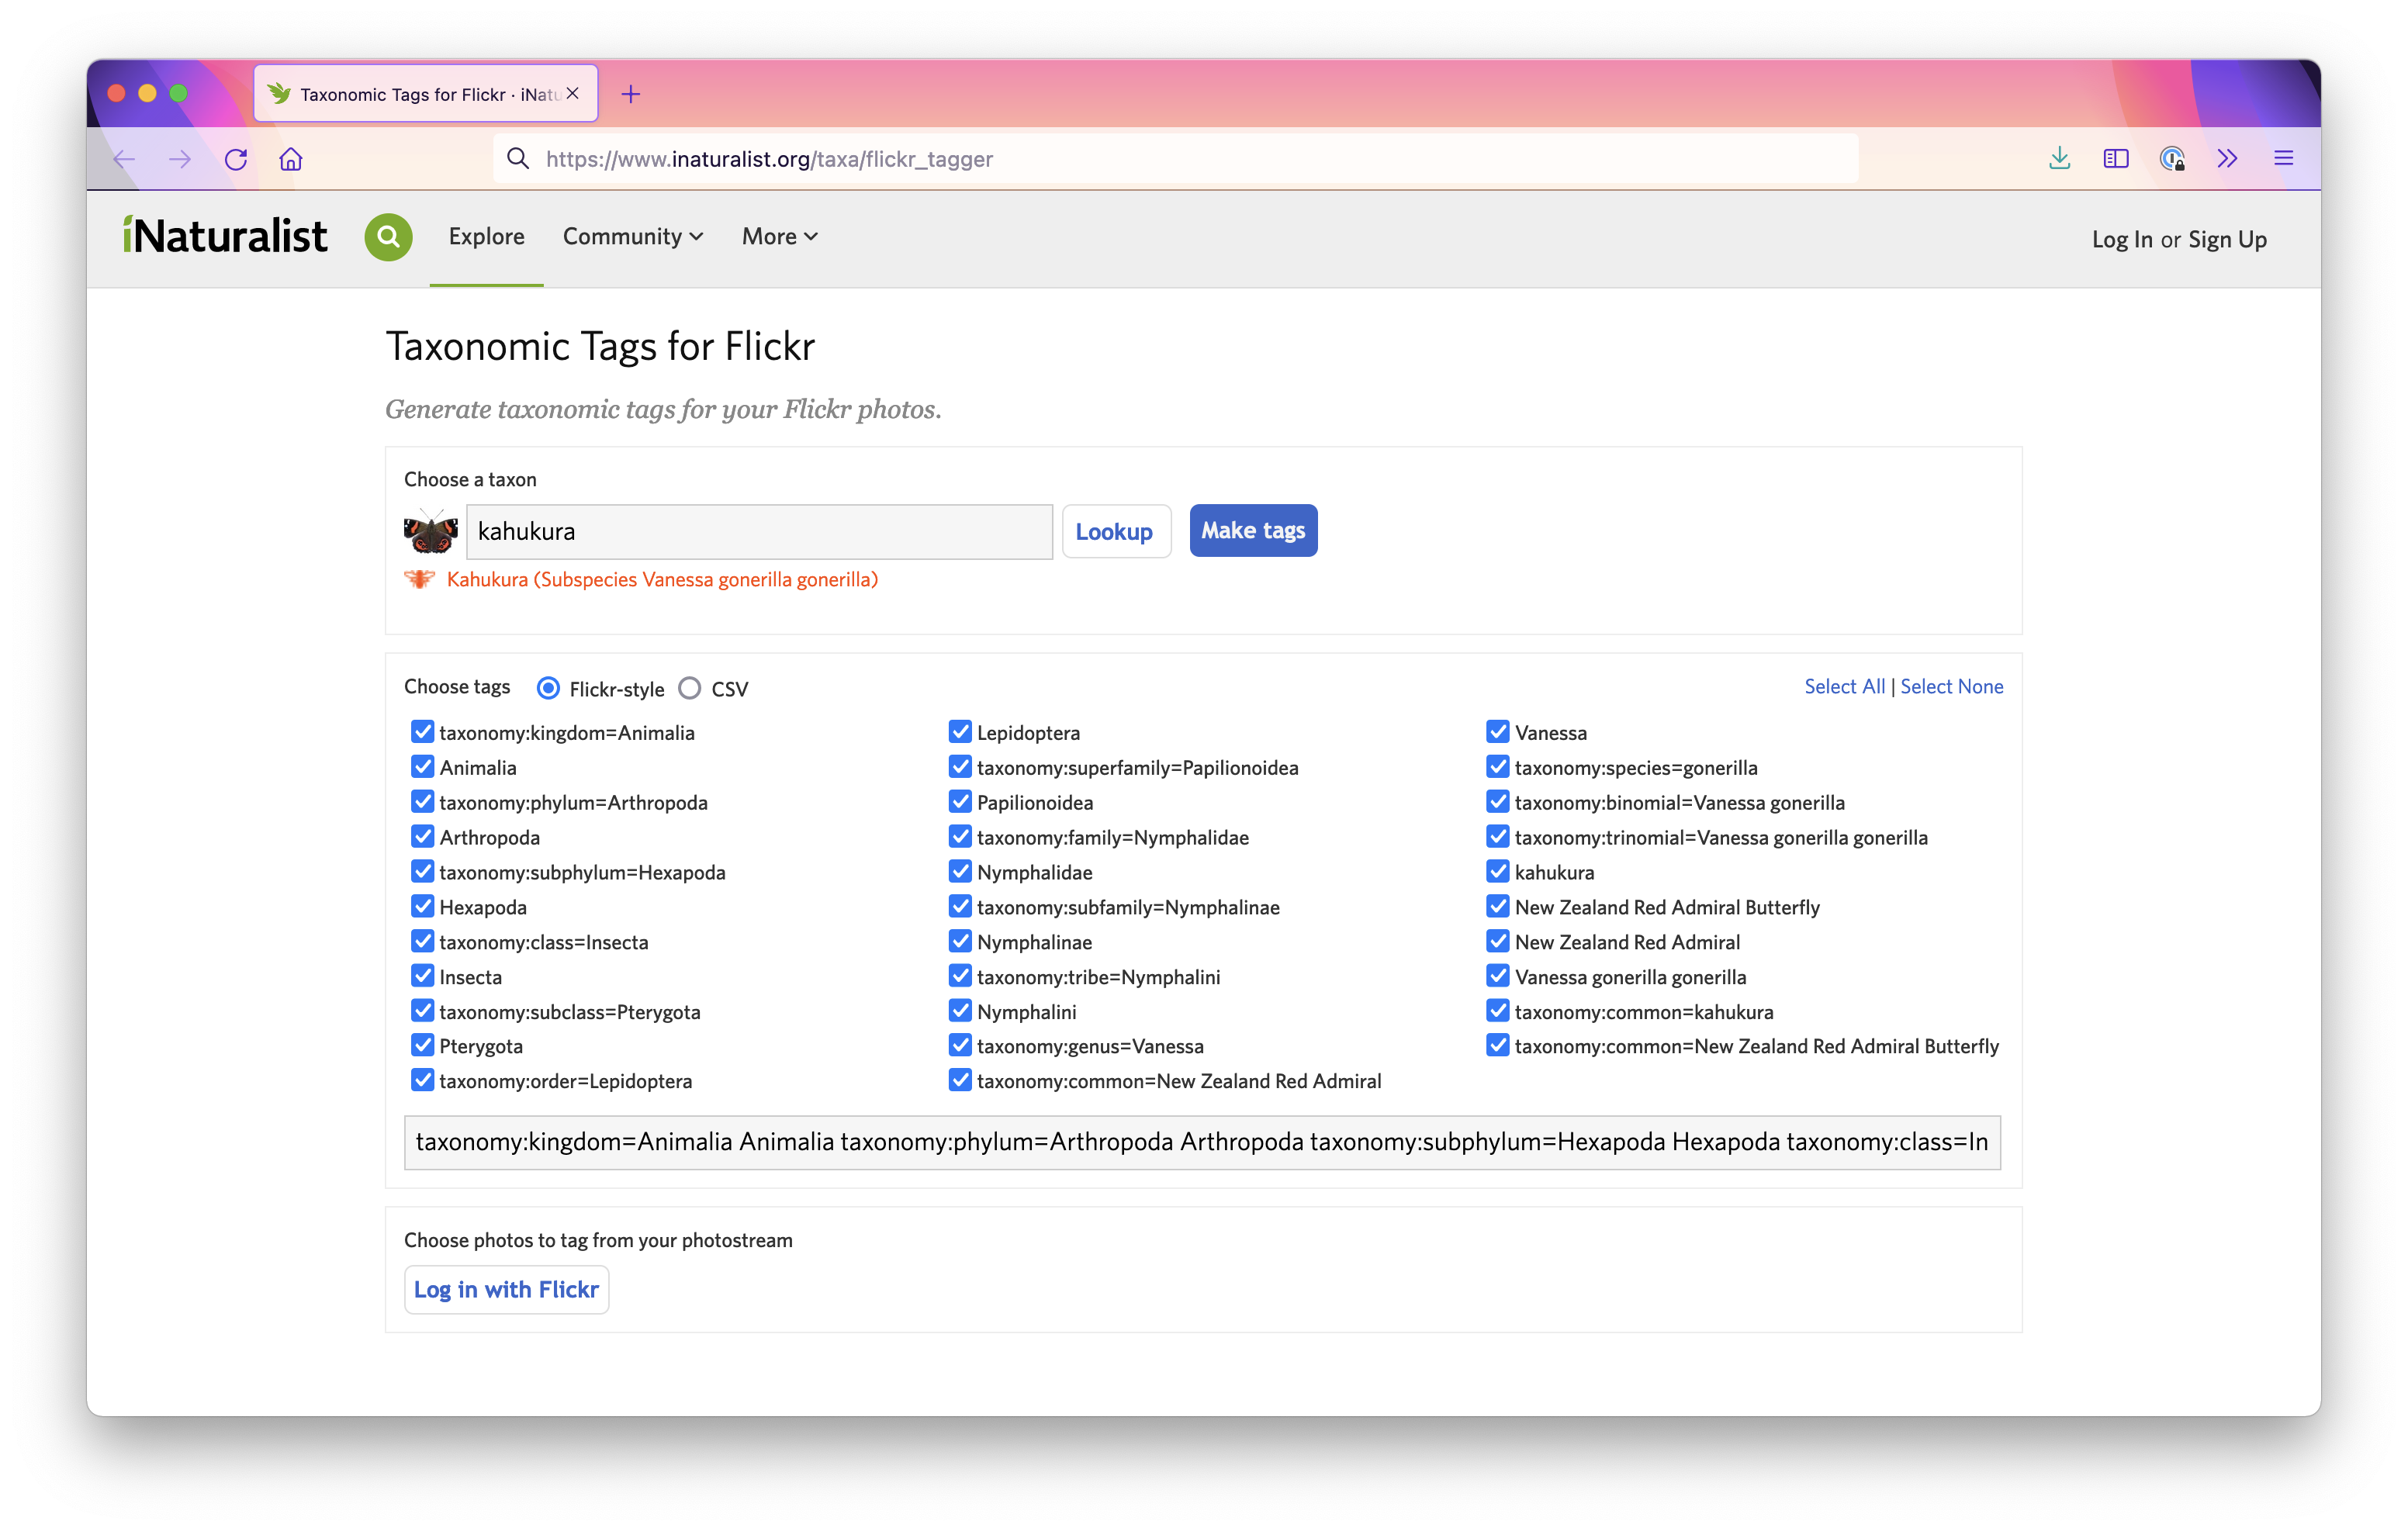
I use hierarchical tags for both species and place names, so photos come up in my darktable searches for higher taxa and larger parent areas. There’s an example tag below for NZ’s kahu kura butterfly, in the Encyclopedia of Life format. This lets me search my photos for things like “taxonomy:genus=Vanessa" and "taxonomy:family=Nymphalidae" and "`kahu kura”. Naturalist doesn’t need the tag hierarchies, just the species and place names, so they get stripped off later.
Species|taxonomy:kingdom=Animalia|taxonomy:phylum=Arthropoda: Mandibulata|taxonomy:class=Insecta|taxonomy:order=Lepidoptera|taxonomy:family=Nymphalidae|taxonomy:genus=Vanessa|taxonomy:binomial=Vanessa gonerilla|taxonomy:trinomial=Vanessa gonerilla gonerilla|taxonomy:common=red admiral butterfly kahu kura|Vanessa gonerilla gonerilla
Darktable keeps an internal database of all the tags I’ve ever used in its photo library. All I need to do is start typing any part of any tag I’ve used before and it will show up in the tag list to use. That’s handy when I don’t quite remember how to spell a species name.
When I first enter a species name I’ve not used before, I typically look it up on the New Zealand Organisms Register website and add it to a species names database I keep on my computer. You can instead get the complete hierarchical tag from iNaturalist’s clever taxonomic tags tool. If you do that, just be sure to add the complete scientific name to the end of the hierarchy (like I’ve done in the kahu kura example below). That’s because my iNatTagCleaner script later will strip away everything but that name for uploading to iNaturalist.
I also duplicate and crop a photo in darktable, if there is more than one species in a photo that I want to share as an iNaturalist observation. A useful thing about the darktable photo catalogue is that duplicating a photo in the catalogue just makes another XML text file on my computer. It doesn’t need to duplicate the photo file itself.
Tag photos with observation fields and iNat tags
iNaturalist has this great feature called observation fields that are used to consistently annotate observations with more information. These observation fields can all be entered as tags into darktable and, when formatted correctly, they get automatically picked up by iNaturalist when the photo is uploaded. For example, the following tags in a photo will automatically add to iNaturalist the observation field “Insect life stage” with the value “adult” and set “Sex” to “male”.
Insect life stage=adult
Sex=male
If you’re already familiar with the iNaturalist website, you might have seen or used its Annotations, which are a small list of core attributes that can be applied to all observations. Lifestage and Sex are two of these. If I tag a photo with Insect life stage=adult and Sex=male, these observation fields and values will get automatically added to iNaturalist when I upload the photo. Also, helpfully, iNaturalist will also automatically fill in the associated Annotations on the observation. Most observation fields don’t map on to an iNaturalist Annotation, but those that do will be automatically grabbed.
To keep these tags organised in darktable, I preface all iNaturalist observation fields with iNaturalist field|. For example, in darktable I add those above examples as iNaturalist field|Insect life stage=adult and iNaturalist field|sex=male. I use my iNatTagCleaner script (below) to strip off the iNaturalist field| before I upload to iNaturalist.
iNaturalist also has a “tags” option for observations, which are free-form keywords that you can add to observations. These are generally less useful than observation fields because they’re not as consistent. However, they can be helpful for adding additional information to observations.
I have some personal iNaturalist tags in my darktable that I apply to relevant photos. Here are a few examples.
iNaturalist tag|20x magnification through dissecting microscope
iNaturalist tag|10x magnification through hand lens
iNaturalist tag|habitat sand dune
iNaturalist tag|habitat tidepool
iNaturalist tag|forest regeneration
iNaturalist tag|aftermath of fire
iNaturalist tag|skull
iNaturalist tag|weed control
There usually aren’t observation fields for this information, but it’s still useful to include these details as tags. As with my iNaturalist field| preface, I use the iNaturalist tag| preface to keep my (many) tags in darktable organised. My iNatTagCleaner script takes off the iNaturalist tag| before I upload to iNaturalist.
Upload tagged photos to iNaturalist
When my batch of photos is all tagged and ready for upload, I export them as JPG files from darktable. They’re exported into a folder on my computer that I keep set aside and empty just for my iNaturalist uploads.
I then run a short shell script for the Mac Terminal that I wrote (iNatTagCleaner) which works through all the image files in my upload folder, simplifying the tags by stripping off private tags (like people’s names) and tags iNaturalist doesn’t need (like higher taxonomic names). It does this by only retaining the last tag item in all hierarchical tags beginning with Species|, Place|, iNaturalist field|, iNaturalist tag|, and GeoTagged|, and removing all other tags. That way I can happily add more personal tags to my photos in darktable and not have them all shared when I upload to iNaturalist. (Running a shell script is a Mac and Linux thing. I’m not sure what the Windows equivalent is but there will be one.)
My photos are now all ready for iNaturalist. I drag my photos all at once onto the iNaturalist upload webpage, and wait. It takes iNaturalist a while for all the photos and their data to get processed, so I usually keep it to under a hundred photos at the time. I do something else for five minutes and come back to that webpage. All the species names, locations, dates, times, tags, and observation fields are automatically grabbed from the photos. There are only two manual things I sometimes need to do on iNaturalist during this process. One is to combine together multiple photos from one observation. The other is to select and mark the captive/cultivated observations. While I have the field is it wild? added to my photos, unfortunately iNaturalist doesn’t ap any observations fields onto “captive/cultivated”). It’s got to be done manually at upload (or Batch added after upload). Then I tap the Submit button and up they all go.
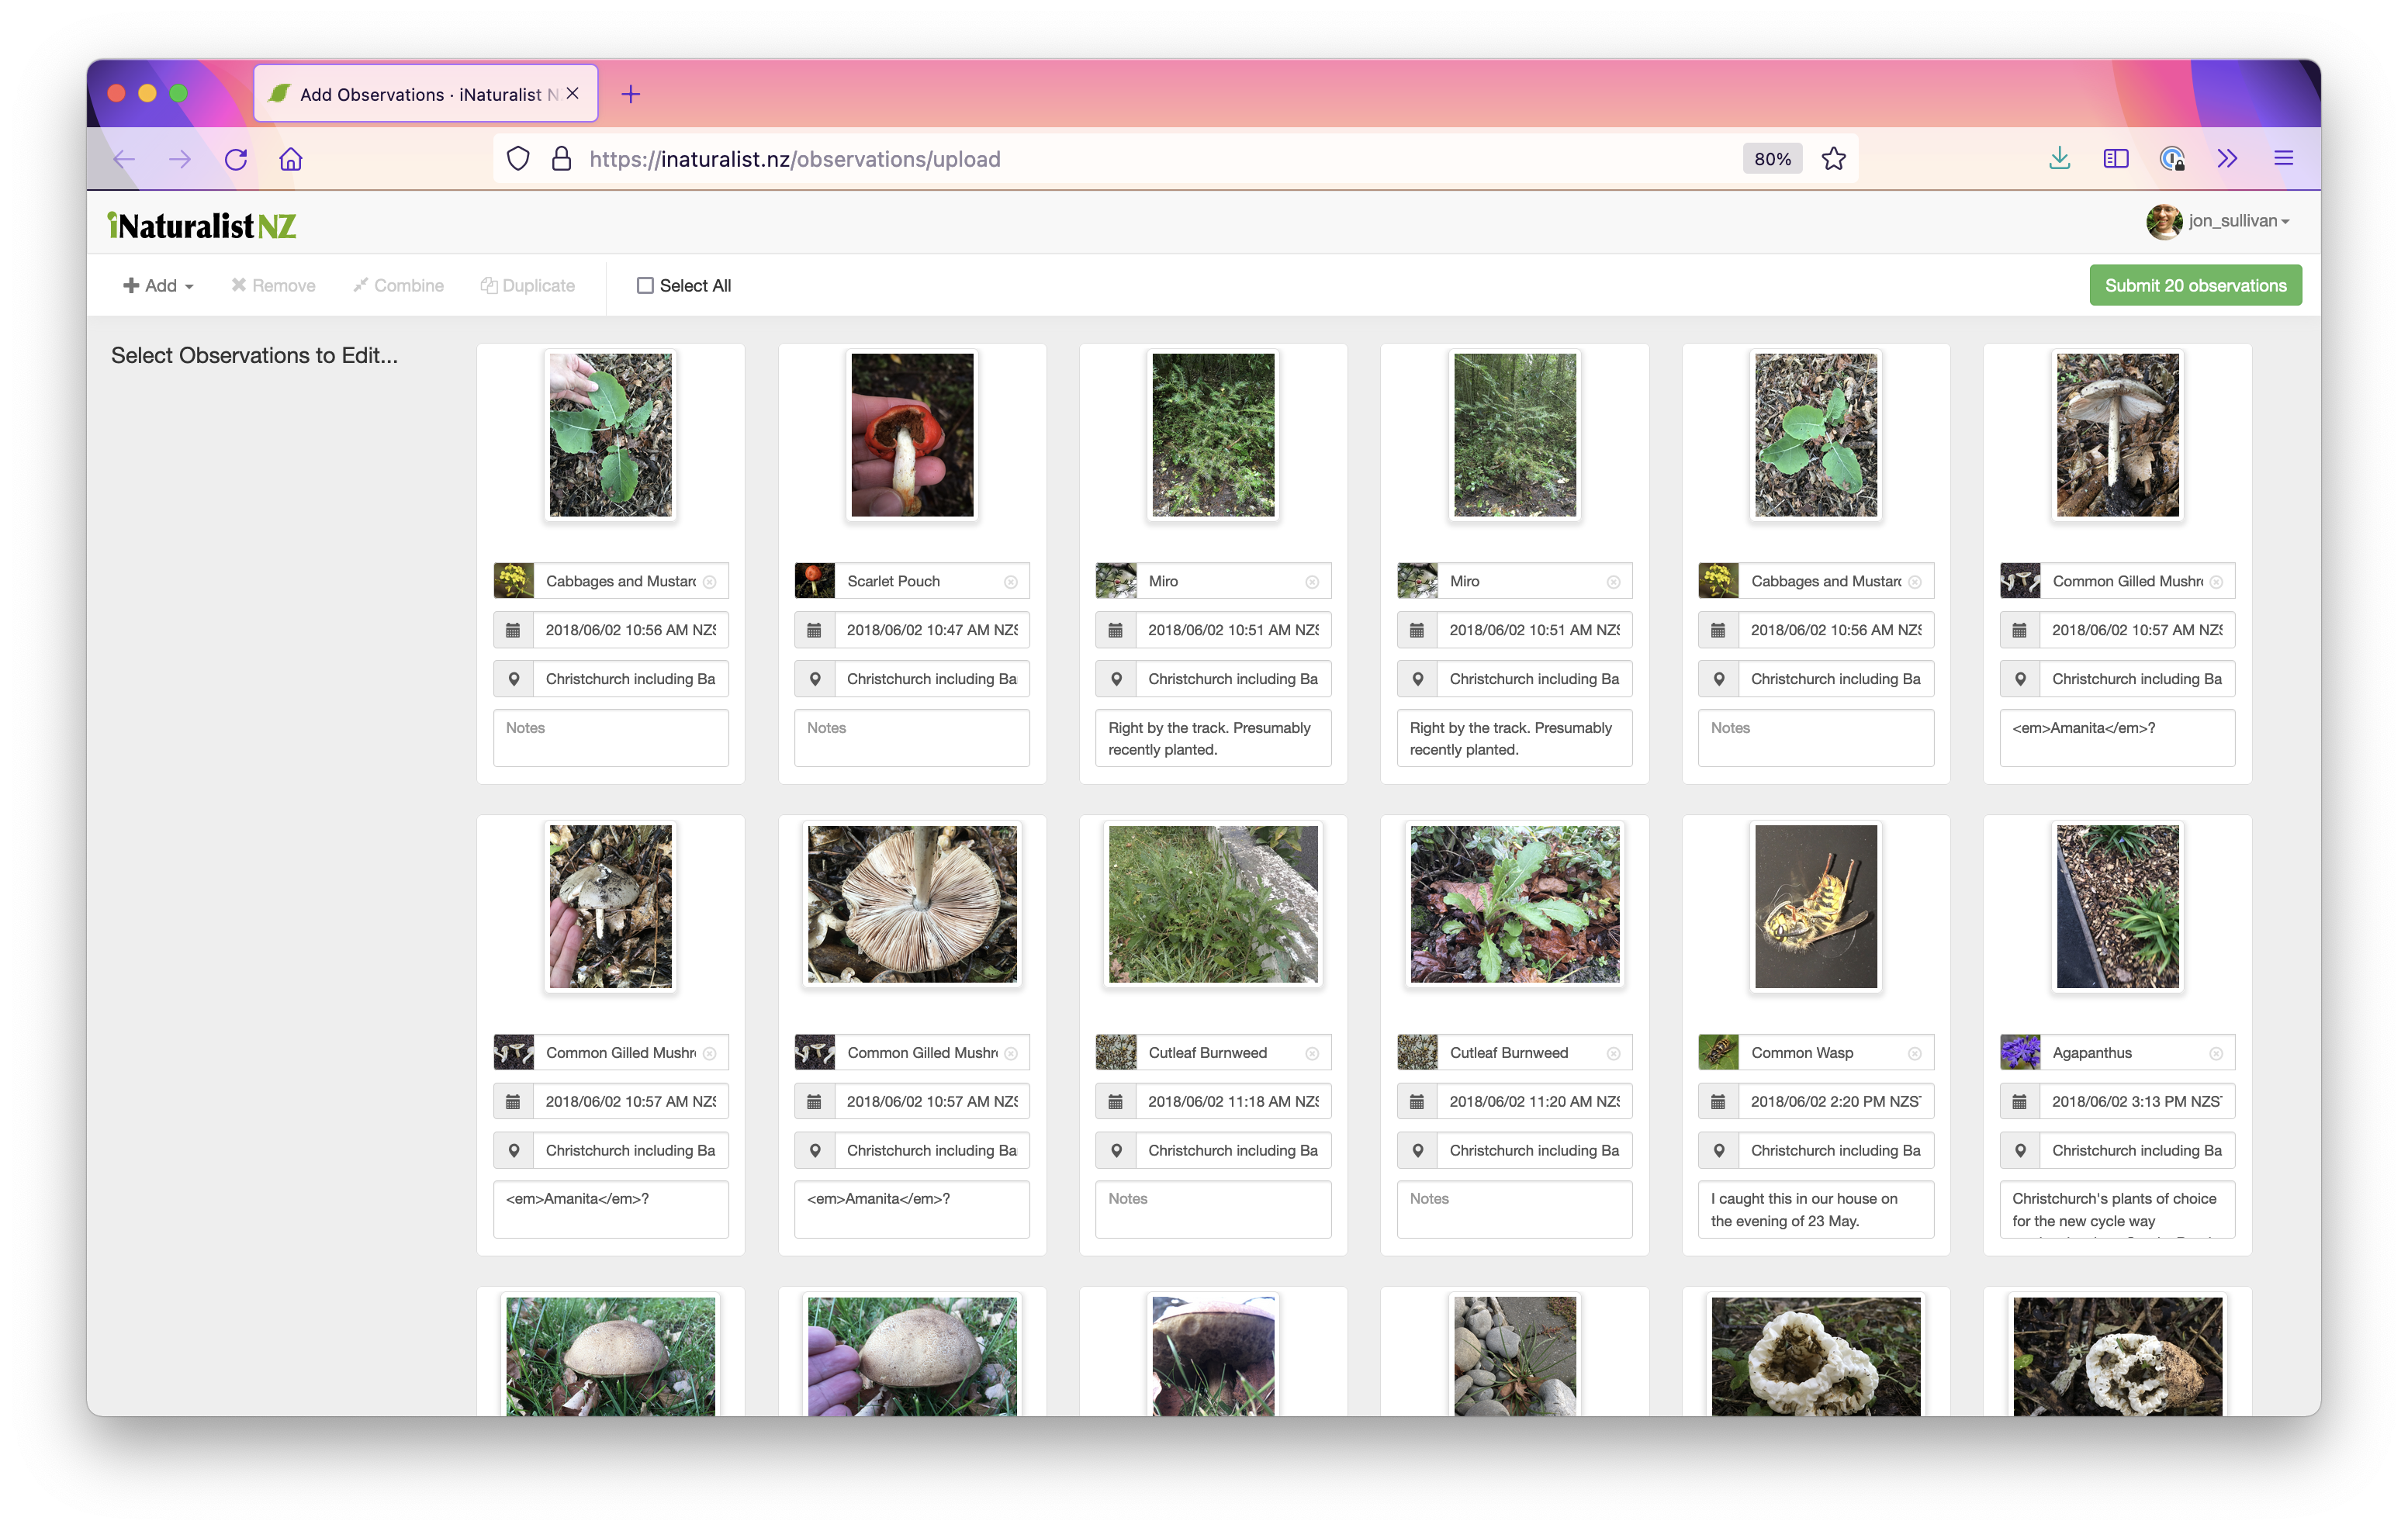
That’s it! Then I keep an eye on iNaturalist for all the helpful identifications and comments from iNat users.
So, my process is geotag-tag-export-simplify-upload. This is the fastest way I’ve found to locate, ID, annotate, and upload hundreds of photos. It has the added benefit of retaining a set of fully tagged photos on my computer.